The basic controls of Maya are exactly the same as Unity so it didn't take too long to figure them out:
- Select any GameObject and press the F key. This will centre the Scene View and pivot point on the selection.
- Hold Cmd and click-drag to orbit the camera around the current pivot point.
- Hold Cmd and middle click-drag to drag the Scene View camera around.
- Hold Cmd and right click-drag to zoom the Scene View. This is the same as scrolling with your mouse wheel.
Maya also has the exact same GameObject editing buttons as Unity:
- G - Select
- W - Move
- E - Rotate
- R - Scale
To begin the spaceship we created a cube, to do this you need to select the cube option in the toolbar above the main window, drag the base out for the cube, and then drag up to create the height. After this it was a case of right clicking on the object, choosing faces and then using the extrude tool. The extrude tool allows the user to expand the object they are editing, it's best to do this whilst a face of an object is selected otherwise it can get complicated. We also used the edge loop tool, to create more faces on the object to create curves and more complex shapes, both of these can be found in the Mesh Tools option.
Once we created half of our spaceship it was time to make its symmetrical other so that we would have a complete spaceship. To do this you go to File - Duplicate Special and click on the little box to the side of it, this opens up options where you can change the scale value to -1 for the objects reflection axis to make a whole spaceship.
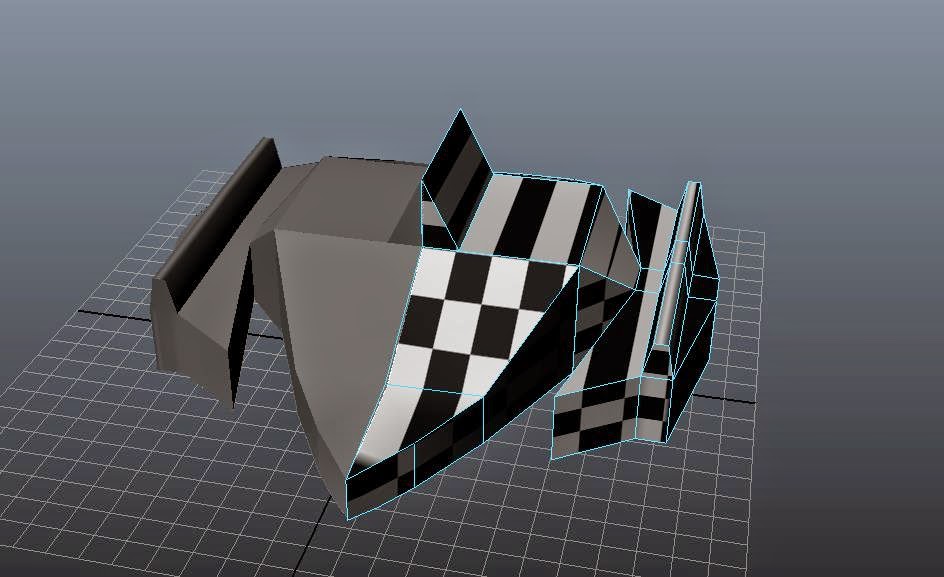
Once we had created a whole spaceship and were happy with it we had to start UV mapping it, which honestly was the worst part by far. To begin UV mapping you need to right click on the object and make sure it is in object mode, then select the object. Once this is done right click on the object again and go to assign new material, once that menu opened we needed to choose blinn. The blinn options come up on the right hand side of the screen, in there we needed to click on the icon next to colour and choose checkered, once this was done we went to create UVs - plannar mapping.
UV Mapping is useful when adding on a texture, you need to play around with the different faces of the object and the UV mapping on it to get it right where its a checkered pattern. What it does is allows you to add on a texture without it warping and looking odd, to create a UV mapping pattern you can edit in photoshop you need to sort out all the different UV mappings in a plan.
It begins like that but as you sort them out they become clearer and you can tell what is what and what needs to be coloured. To create a good plan you need to have connected pieces together so you know what is what, and take up as make space as possible on the plan leaving little empty. Then save it as a .tga file and open it up in photoshop where it can be coloured.
Once it's been coloured it needs to be saved, then open Maya up again and add a blinn onto the object. Then click on the icon next to colour and choose file, then in the window to the right you can choose the file you want to texture the object with. If it doesn't show try pressing 6 as the textures option might be turned off.


No comments:
Post a Comment