Camera
To begin with we focused on getting the camera into the correct position, currently all that was viewable on the Game view is the back of the ship. To do this we first reset the cameras position, so the same way we did it before we went to the gear options in transform menu of the camera and clicked reset.
We then set the camera to a rotation of x = -90 and position y = -10 as this was the best position to place the camera. Also we needed to change the camera projection as it was currently on perspective, but because this is a flat game perspective was not necessary so we changed it to Orthographic and changed the orthographic size to -10 so the ship would be a reasonable size and we would have more player to create a game in.
It was also necessary to change where the ship started, because when you first place the camera in the position the ship is in the centre. To do this all we did was move the camera on the y axis to -7, we also changed the clear flag to a solid colour (black) as currently we had the default setting of Skybox which isn't what we needed for the game.
Lighting
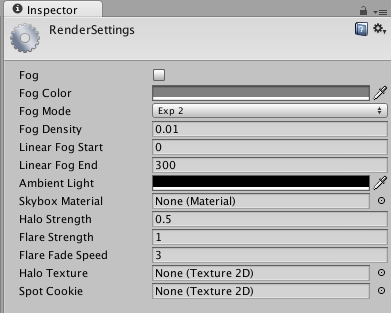
To begin the lighting we wanted a completely blank slate so we had to get rid of the ambient lighting, this is the lighting that will effect everything on the screen but that was not what we wanted. To do this we had to go to Edit - Render Settings and then change the colour of the ambient lighting to black in the inspector window.
So now our ship was completely in the dark and we could just about see the jets coming out of the engines, this meant we had to add on three lights; main, fill, and rim.
For the main light we added a directional light by right clicking the Hierarchy menu and clicking Light - Directional Light, we then reset the position of the light and changed the following:
- Rotation - x = 20, y = -115
- Intensity - 0.75
This created the main light around the ship and lit the right hand side mainly, which meant we needed to add in a fill light to light up the left hand side a bit. To do this we duplicated the main light and renamed it to "Fill Light", reset the position and changed the following:
- Rotation - x = 5, y = 125
- Intensity - 0.5
- Colour - Choose whatever colour
The point of the colour was to add a bit more a space feel to the ship, it also makes it a little bit more interesting instead of having it all light up in bright white light. The final light we needed to do was the rim light, this was to make the outline of the ship a little clearer, so we duplicated the main light again and renamed it to "Rim Light", reset the position and changed the following:
- Rotation - x = -5, y = 45
- Intensity - 0.25
Which the ended up with the ship being fully lit and looking good on the game view, it also means the player can actually see what they are controlling because with no lighting they would have absolutely no clue.
Background
All we were missing now was the background of the game, currently it was just a black screen which isn't that interesting so we added in a texture with a space kind of feel.
We made a 3D Object called a Quad at first to place the texture onto, to do this we right clicked in the Hierarchy window and selected 3D Object - Quad. This came into the scene in a very awkward angle so needed to be changed, we rotated and scaled it to the following:
- Scale - x = 15, y = 30
- Rotate - x = 90
Although that might not always be right as the second time I went through the tutorial I had to play around with the Quad a little bit to get it into the correct place, another issue might be that the ship is part way into the background so it may need to be moved a bit more as well. We then removed the mesh collider and changed the texture of the quad to the one provided in the Assets folder.
Also the background was darker than in that screenshot to begin with, to change this we had to change the shader to Unlit - Texture which made the background a lot lighter and more visible to the player.
Moving the Player (Scripting)
Our first actual C# script for the game was to make it possible for the ship to be moved.


No comments:
Post a Comment